
General
Composite vs Wood Decking: A Comprehensive Comparison

Exploring the world of decking materials, this article delves into the differences between composite and wood decking. From durability to maintenance, cost-effectiveness to environmental impact, we uncover the pros and cons of each option to help you make an informed decision for your outdoor space.
Composite vs Wood Decking
When it comes to choosing between composite and wood decking, there are several factors to consider, including durability, maintenance requirements, cost-effectiveness, and environmental impact.
Durability
- Composite decking is known for its high durability, as it is resistant to rot, mold, and insects.
- Wood decking, on the other hand, is prone to rotting, warping, and splintering over time, especially when exposed to harsh weather conditions.
Maintenance Requirements
- Composite decking requires minimal maintenance, usually just regular cleaning with soap and water to keep it looking new.
- Wood decking needs to be regularly stained, sealed, and treated to prevent decay and prolong its lifespan.
Cost-effectiveness
- While composite decking may have a higher upfront cost, it can save money in the long run due to lower maintenance requirements and longer lifespan.
- Wood decking may be cheaper initially, but ongoing maintenance costs can add up over time, making it potentially more expensive in the long term.
Environmental Impact
- Composite decking is usually made from recycled materials, making it a more eco-friendly option compared to using natural wood.
- Wood decking involves cutting down trees, which can contribute to deforestation and have a negative impact on the environment.
Material Composition

Composite decking and wood decking are both popular choices for outdoor decks, each with its own unique set of materials and characteristics.Composite decking is made from a combination of wood fibers, recycled plastics, and binding agents. This mixture results in a durable and low-maintenance material that mimics the look of natural wood.
On the other hand, wood decking is typically made from natural wood, such as cedar, redwood, or pressure-treated pine.
Composite Decking Materials
Composite decking materials are manufactured through a process of extrusion, where the wood fibers and plastic are combined and heated to form a solid board. The addition of binding agents helps to ensure the durability and longevity of the composite material.
This manufacturing process allows for a consistent and uniform product that is resistant to rot, mold, and insects.
Wood Decking Materials
Wood decking can be made from a variety of wood types, with cedar and redwood being popular choices due to their natural resistance to rot and insects. Pressure-treated pine is another common option, treated with chemicals to enhance its durability and longevity.
However, wood decking requires regular maintenance, such as staining and sealing, to prevent rot, mold, and insect infestations.
Resistance to Rot, Mold, and Insects
When it comes to resistance to rot, mold, and insects, composite decking has a clear advantage over wood decking. The synthetic materials used in composite decking make it highly resistant to these common issues, eliminating the need for frequent maintenance and repairs.
In contrast, wood decking is more susceptible to rot, mold, and insect damage, requiring regular upkeep to prevent deterioration.
Aesthetics and Design
When it comes to choosing between composite and wood decking, aesthetics and design play a crucial role in determining the overall look and feel of your outdoor space. Let's explore the different options and impacts of each type of decking material.
Composite Decking Appearance Options
Composite decking offers a wide range of appearance options, mimicking the look of natural wood while providing added durability and low maintenance. You can find composite boards in various colors, textures, and finishes, allowing you to customize your deck to match your personal style and outdoor aesthetic preferences.
Natural Look of Wood Decking
Wood decking exudes a natural warmth and beauty that is hard to replicate with any other material. The authentic look and feel of real wood can create a cozy and inviting atmosphere in outdoor spaces, enhancing the overall aesthetics of your deck.
Over time, wood decking weathers gracefully, developing a unique patina that adds character to your outdoor living area.
Versatility in Design
When it comes to design flexibility, both composite and wood decking have their strengths
Enhancing Architectural Styles
Composite decking is ideal for modern and contemporary architectural styles, offering sleek and streamlined designs that complement minimalist aesthetics. On the other hand, wood decking is perfect for traditional and rustic architectural styles, adding a touch of natural elegance and charm to classic homes and cottages.
Whether you prefer a clean and contemporary look or a warm and traditional feel, both composite and wood decking can enhance the architectural style of your outdoor space.
Installation and Maintenance
When it comes to installing and maintaining decking, there are significant differences between composite and wood materials. Let's explore the key points for each type.
Installation Process
- Composite decking typically requires less maintenance than wood decking, making it an attractive option for many homeowners.
- Wood decking installation involves cutting, drilling, and fastening the boards, which can be labor-intensive.
- Composite decking boards are designed to be easy to cut and install, often with hidden fasteners for a clean finish.
Maintenance Tasks
- Wood decking requires regular staining, sealing, and cleaning to prevent rot, mold, and insect damage.
- Composite decking only needs occasional cleaning with soap and water to remove dirt and debris.
- Regular inspections for loose boards or damaged areas are recommended for both types of decking to ensure safety and longevity.
Tips for Prolonging Composite Decking Lifespan
- Regularly clean your composite decking to prevent mold and mildew growth.
- Avoid using harsh chemicals or pressure washers, as they can damage the surface of the composite material.
- Inspect for any signs of wear or damage and address them promptly to prevent further issues.
Cleaning and Repairing Ease
- Composite decking is easier to clean than wood, requiring only mild soap and water for regular maintenance.
- Repairing composite decking is also simpler, with the option to replace individual boards if needed without affecting the entire structure.
- Wood decking may require sanding, staining, or even board replacement for repairs, which can be more time-consuming and costly.
Summary

In conclusion, whether you choose composite or wood decking, each has its own unique benefits and considerations. By weighing factors like durability, maintenance, aesthetics, and installation, you can select the best option that suits your preferences and lifestyle. Enhance your outdoor living experience with the perfect decking choice for your needs.
Commonly Asked Questions
Is composite decking more durable than wood decking?
Composite decking generally has higher durability and requires less maintenance compared to wood decking. It is resistant to rot, mold, and insects, making it a long-lasting option for outdoor spaces.
What are the maintenance requirements for composite decking?
Composite decking requires minimal maintenance, usually limited to regular cleaning with soap and water. Unlike wood decking, it does not need staining or sealing to maintain its appearance.
How do the cost-effectiveness of composite and wood decking compare?
While composite decking may have a higher upfront cost, it can be more cost-effective in the long run due to its durability and low maintenance requirements. Wood decking may require more frequent maintenance and replacement, adding to long-term costs.
What are the environmental impacts of using composite materials for decking?
Composite decking is often made from recycled materials, reducing the demand for new wood and the environmental impact of deforestation. However, the manufacturing process of composite materials can still have its own environmental footprint.
General
Driveway Gate Cost Estimator: Factors, Pricing, and Tips
Exploring the costs associated with driveway gates can be a complex and detailed process. From materials to additional features, there are various factors that contribute to the overall estimation. Let's delve into the world of driveway gate cost estimation to understand the intricacies involved in this essential home improvement project.
As we navigate through the different aspects of driveway gate cost estimation, we will uncover valuable insights that can help homeowners make informed decisions when considering this upgrade for their property.
Factors affecting driveway gate cost estimation
When estimating the cost of a driveway gate, several factors come into play that can significantly impact the final price. These factors include the materials used, gate size and design complexity, additional features, and the choice between DIY installation and professional installation.
Materials Used for Driveway Gates
The material of the driveway gate plays a crucial role in determining the overall cost. Common materials used for driveway gates include wrought iron, steel, aluminum, vinyl, and wood. Each material comes with its own price point and maintenance requirements.
For example, wrought iron gates tend to be more expensive due to their durability and aesthetic appeal, while vinyl gates are more budget-friendly but may require more frequent maintenance.
Gate Size and Design Complexity
The size and design complexity of the driveway gate will also impact the cost estimate. Larger gates or gates with intricate designs will require more materials and labor, resulting in a higher price tag. Simple, standard-sized gates will generally be more cost-effective compared to custom-designed or oversized gates.
Additional Features
Adding features such as automation, intercom systems, decorative elements, or ornamental details can significantly increase the cost of a driveway gate. Automated gates, for example, require motors and sensors, while intercom systems add a level of convenience but come at an additional cost.
The more features you incorporate into your gate design, the higher the overall price will be.
DIY Installation vs. Professional Installation
Deciding between DIY installation and professional installation can also impact the cost of a driveway gate. While a DIY approach may initially seem more cost-effective, hiring professionals ensures proper installation, reducing the risk of errors and future maintenance costs. Professional installation may come at a higher upfront cost but can save you time and money in the long run.
Pricing breakdown for driveway gate components
When estimating the cost of a driveway gate, it's essential to consider the breakdown of costs for various components. This breakdown includes materials, additional components, gate styles, installation costs, and labor fees.
Materials Cost Breakdown
- Wood: $800 - $5,000
- Iron: $1,500 - $12,000
- Aluminum: $1,000 - $6,000
- Vinyl: $1,000 - $4,000
Additional Components Cost Breakdown
- Hinges: $20 - $200
- Locks: $50 - $300
- Sensors: $100 - $500
- Remote Controls: $50 - $400
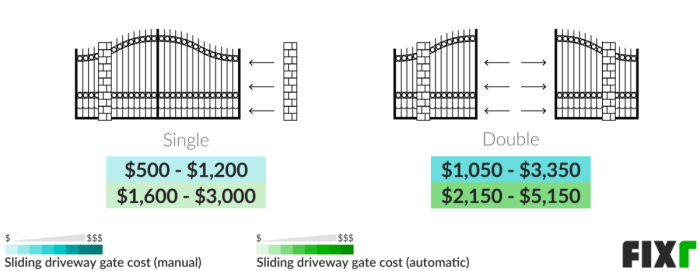
Cost Variations Based on Gate Styles
- Sliding Gates: $1,500 - $10,000
- Swinging Gates: $800 - $6,000
- Bi-fold Gates: $2,000 - $12,000
Installation Costs and Labor Fees
- Average Installation Costs: $500 - $2,500
- Average Labor Fees: $50 - $100 per hour
Regional cost differences and considerations

Location plays a significant role in determining the cost of driveway gate installation. Factors such as labor costs, material availability, climate, and terrain can all impact the overall estimate
Labor Costs and Material Availability
In some regions, labor costs may be higher due to demand or the cost of living. Additionally, the availability of certain materials can vary by location, affecting both pricing and installation timelines. For example, areas with limited access to specific gate materials may incur higher costs due to transportation expenses.
Climate and Terrain Impact
Regions with extreme weather conditions or challenging terrains may require additional considerations during installation. For instance, areas prone to heavy snowfall or high winds may need more robust gate designs for durability. Similarly, uneven terrains or rocky landscapes can complicate the installation process, potentially increasing labor costs.
Finding Local Contractors and Suppliers
To get accurate cost estimates tailored to your region, it's crucial to work with local contractors and suppliers. Local professionals are familiar with regional pricing trends and can provide insights specific to your area. Researching and comparing multiple quotes from local experts can help you make informed decisions and ensure that you receive competitive pricing for your driveway gate project.
Tips for accurate driveway gate cost estimation
Estimating the cost of a driveway gate accurately is crucial for homeowners looking to enhance their property's security and curb appeal. Here are some tips to help you navigate the process:
Step-by-step guide for homeowners to estimate driveway gate costs
When estimating the cost of a driveway gate, consider factors such as material, size, style, and automation. Begin by researching the average prices for different types of gates and their installation costs in your area.
How to factor in maintenance costs over the gate’s lifespan
Remember to account for maintenance costs when estimating the total cost of a driveway gate. Regular upkeep, repairs, and potential replacements should be factored into your budget to ensure the gate's longevity.
Insights on obtaining multiple quotes and negotiating with contractors
Seek quotes from multiple contractors to compare prices and services offered. Don't hesitate to negotiate with contractors to get the best deal possible. Ask about any discounts or promotions that may be available.
Ways to prioritize features within a budget for cost-effective gate solutions
Identify the essential features you need in a driveway gate and prioritize them within your budget. Consider options like manual vs. automatic gates, different materials, and additional security features to find a cost-effective solution that meets your requirements.
Ultimate Conclusion

In conclusion, understanding the nuances of driveway gate cost estimation is crucial for anyone looking to enhance the security and aesthetics of their property. By considering the various factors and pricing breakdowns discussed, individuals can approach this project with confidence and clarity.
FAQ Section
What are the common materials used for driveway gates?
Driveway gates can be made of materials such as wood, iron, aluminum, or vinyl, each impacting the overall cost differently.
How does gate size influence cost estimates?
The larger the gate, the more materials and labor are required, resulting in higher cost estimates.
Is DIY installation cheaper than professional installation?
While DIY installation can save on labor costs, it may lack the precision and expertise of professional installation, potentially leading to additional expenses in the long run.
How can homeowners factor in maintenance costs for driveway gates?
It's essential to consider the long-term maintenance requirements of different materials used for driveway gates to estimate costs accurately.
What are some tips for negotiating with contractors for driveway gate projects?
Homeowners can obtain multiple quotes from different contractors, compare the details, and negotiate based on the scope of work and features desired within their budget.
General
Exploring Energy Efficient Home Exteriors: A Guide to Cutting Costs and Going Green

Delving into the realm of energy efficient home exteriors, this article sheds light on the importance of sustainable living and cost-effective solutions. From materials to design strategies, discover how you can enhance your home's efficiency while reducing your environmental footprint.
Importance of Energy-Efficient Home Exteriors
Energy-efficient home exteriors play a crucial role in reducing utility costs and promoting environmental sustainability. By utilizing energy-efficient materials and designs, homeowners can enjoy a range of benefits while contributing to a greener future.
Reduced Utility Costs
- Energy-efficient home exteriors help in reducing energy consumption, leading to lower electricity and heating bills.
- Proper insulation and sealing of windows and doors prevent energy wastage, resulting in cost savings over time.
Environmental Sustainability
- Energy-efficient exteriors reduce carbon footprint by decreasing energy consumption and reliance on non-renewable resources.
- By using sustainable materials and designs, homeowners can minimize environmental impact and contribute to a healthier planet.
Benefits of Energy-Efficient Materials and Design
- Energy-efficient materials like high-performance windows and insulation improve indoor comfort and air quality.
- Well-designed exteriors can enhance curb appeal, increase property value, and create a more sustainable living space.
Energy-Efficient Exterior Materials
When it comes to energy-efficient home exteriors, the choice of materials plays a crucial role in minimizing energy consumption and maximizing sustainability. Various types of energy-efficient materials are available in the market, each with its own set of benefits and considerations.
Types of Energy-Efficient Exterior Materials
- Insulated Vinyl Siding: Insulated vinyl siding not only provides excellent insulation but also helps in reducing energy costs by maintaining a consistent indoor temperature. It is durable, low-maintenance, and comes in a variety of colors and styles.
- Fiber Cement: Fiber cement siding is a durable and low-maintenance option that offers great thermal insulation properties. It is resistant to rot, fire, and pests, making it a long-lasting choice for energy-efficient home exteriors.
- Wood Cladding with Thermal Breaks: Wood cladding with thermal breaks combines the natural beauty of wood with added insulation to improve energy efficiency. By incorporating thermal breaks, this material helps prevent heat loss and enhance the overall insulation of the home.
Durability and Maintenance of Energy-Efficient Exterior Materials
Energy-efficient exterior materials are designed to be durable and require minimal maintenance to ensure long-term performance. Regular cleaning and inspections can help prolong the lifespan of these materials, reducing the need for repairs or replacements.
Innovative Materials for Enhancing Energy Efficiency
- Reflective Roofing Materials: Reflective roofing materials, such as cool roofs, help reduce heat absorption and lower cooling costs by reflecting sunlight away from the home. These materials can significantly improve energy efficiency in warmer climates.
- Insulated Concrete Forms (ICFs): Insulated concrete forms provide superior insulation and energy efficiency by creating a continuous thermal barrier. They are strong, durable, and offer excellent soundproofing properties in addition to energy savings.
- Spray Foam Insulation: Spray foam insulation is a versatile material that can be applied to roofs, walls, and foundations to improve energy efficiency. It forms a tight seal, preventing air leakage and reducing heating and cooling costs.
Design Strategies for Energy-Efficient Home Exteriors
When it comes to maximizing energy efficiency in home exteriors, incorporating key design principles is essential. From proper insulation to strategic landscaping, there are various elements to consider in creating an energy-efficient exterior design. Let's delve into some of the key strategies below
Landscaping Integration
Landscaping plays a crucial role in energy-efficient exterior design. By strategically placing trees, shrubs, and other vegetation around your home, you can provide natural shade during hot summer months, reducing the need for excessive air conditioning. Additionally, well-placed landscaping can act as a windbreak during colder seasons, minimizing heat loss and reducing heating costs.
Insulation, Windows, and Shading Techniques
Insulation is a fundamental component of energy-efficient home exteriors. Properly insulating walls, roofs, and floors can significantly reduce heat transfer, keeping your home cooler in the summer and warmer in the winter. Windows also play a key role in energy efficiency, with double or triple-pane windows providing better insulation than single-pane alternatives.
Additionally, using shading techniques such as awnings, overhangs, or blinds can help block out excessive sunlight, reducing the need for air conditioning and lowering energy consumption.
Technology Integration for Energy-Efficient Home Exteriors
Smart technologies play a crucial role in enhancing energy efficiency in home exteriors. By utilizing innovative solutions, homeowners can reduce their energy consumption and environmental impact. Let's delve into the use of various eco-friendly technologies and automation systems that optimize energy efficiency in home exteriors.
Solar Panels
Solar panels are a popular choice for homeowners looking to harness renewable energy. By installing solar panels on the roof or exterior walls of a house, residents can generate electricity from sunlight. This clean energy source not only reduces reliance on traditional power grids but also lowers energy bills over time.
Rainwater Harvesting
Rainwater harvesting systems collect and store rainwater for various household uses, such as watering gardens or flushing toilets. By incorporating rainwater harvesting into home exteriors, homeowners can conserve water resources and reduce their reliance on municipal water supplies. This sustainable practice also helps to mitigate stormwater runoff and erosion.
Automation and Monitoring Systems
Automation and monitoring systems utilize sensors, timers, and smart devices to optimize energy consumption in home exteriors. For example, automated lighting systems can adjust brightness levels based on natural light conditions, while smart thermostats can regulate indoor temperatures efficiently. By integrating these technologies, homeowners can achieve greater energy savings and environmental benefits.
Wrap-Up
In conclusion, energy efficient home exteriors offer a blend of practical benefits and eco-conscious choices. By implementing the right materials, design techniques, and technologies, you can create a space that is not only energy-efficient but also environmentally friendly. Explore the possibilities and make your home a beacon of sustainability.
Helpful Answers
How do energy-efficient exteriors reduce utility costs?
Energy-efficient exteriors help regulate temperature, reducing the need for excessive heating or cooling, thus lowering utility bills.
What are some innovative materials for energy-efficient home exteriors?
Examples include insulated siding, cool roofs, and low-emissivity windows that enhance energy efficiency.
How can landscaping contribute to energy-efficient exterior design?
Strategic placement of trees and shrubs can provide natural shade, reducing the need for cooling systems during hot weather.
What smart technologies can optimize energy efficiency in home exteriors?
Smart thermostats, automated lighting systems, and energy monitoring devices can help regulate energy usage effectively.
General
Fire Damage Restoration Services: Restoring Properties After the Flames
Exploring the world of fire damage restoration services, this article delves into the crucial process of restoring properties post-fire. From the importance of professional assistance to the common causes of fire damage, let's uncover the key aspects of this essential service.
Overview of Fire Damage Restoration Services
Fire damage restoration services involve the process of repairing and restoring properties that have been affected by fire. This includes cleaning up the damage, removing debris, repairing structural elements, and eliminating smoke odor. It is crucial to seek professional fire damage restoration services to ensure a thorough and safe restoration process.
Importance of Professional Fire Damage Restoration
Professional fire damage restoration experts have the knowledge, experience, and equipment to effectively restore properties after a fire. They can assess the extent of the damage, create a comprehensive restoration plan, and execute the necessary repairs efficiently. Additionally, professionals can address safety concerns, prevent further damage, and ensure that the property is restored to its pre-fire condition.
Common Causes of Fire Damage
- Electrical Malfunctions: Faulty wiring, overloaded circuits, and malfunctioning appliances can lead to electrical fires.
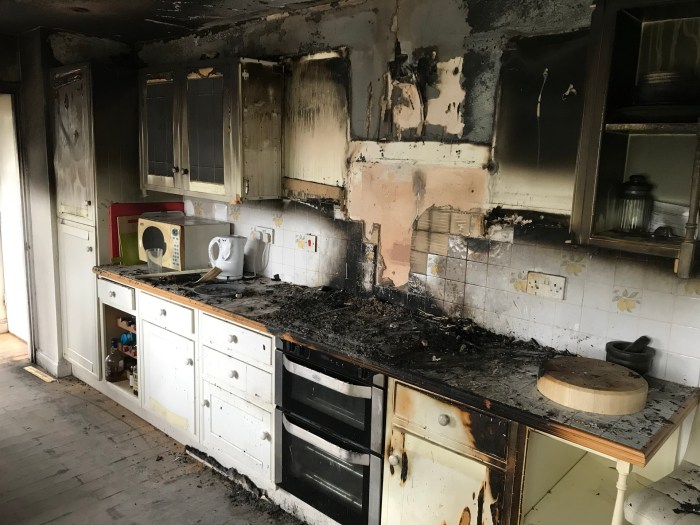
- Cooking Accidents: Unattended cooking, grease fires, and flammable materials near stoves can cause kitchen fires.
- Smoking: Careless smoking habits or improper disposal of cigarettes can result in fires.
- Heating Systems: Malfunctioning furnaces, space heaters, or fireplaces can spark fires if not properly maintained.
- Candles: Left unattended or placed too close to flammable materials, candles can cause fires.
- Natural Disasters: Wildfires, lightning strikes, or earthquakes can also lead to fire damage that requires restoration services.
Process of Fire Damage Restoration
When it comes to fire damage restoration, the process involves several key steps to ensure that the property is effectively cleaned and restored to its pre-fire condition. Professionals play a crucial role in assessing the extent of the damage and determining the best course of action to take.
Various techniques are employed to clean and restore fire-damaged properties, ranging from soot and smoke removal to structural repairs.
Assessment of Fire Damage
Professionals first assess the extent of the fire damage, including damage caused by flames, smoke, and soot. They inspect the property thoroughly to determine the areas affected and the severity of the damage. This assessment helps in developing a comprehensive restoration plan tailored to the specific needs of the property.
Cleaning and Restoration Techniques
- Smoke and Soot Removal: Professionals use specialized equipment to remove smoke residue and soot from surfaces throughout the property. This helps eliminate odors and prevent further damage.
- Structural Repairs: Damaged structures are repaired or replaced to restore the property's integrity. This may involve repairing walls, floors, ceilings, and other structural components.
- Deodorization: Techniques such as ozone treatment or thermal fogging are used to eliminate smoke odors from the property, ensuring a clean and fresh environment.
- Content Cleaning: Personal belongings and furniture are cleaned, deodorized, and restored to their pre-fire condition whenever possible.
- Final Inspection: Once the restoration process is complete, a final inspection is conducted to ensure that the property meets industry standards and is safe for occupancy.
Equipment and Tools Used in Fire Damage Restoration
When it comes to fire damage restoration, having the right equipment and tools is crucial to effectively restore a property back to its pre-fire condition. Here are some essential tools used in the fire damage restoration process:
1. Air Scrubbers
Air scrubbers are essential for removing smoke odor and contaminants from the air. These machines use HEPA filters to capture tiny particles and clean the air, improving air quality in the property.
2. Dehumidifiers
Dehumidifiers are used to remove excess moisture from the air and surfaces, preventing mold growth and further damage. They help in drying out the affected areas efficiently.
3. Thermal Foggers
Thermal foggers are used to dispense deodorizers and neutralizers into the air to combat smoke odors. The fog penetrates into cracks, crevices, and other hard-to-reach areas to eliminate odors effectively.
4. Ozone Generators
Ozone generators are used to break down smoke molecules and eliminate odors. They are effective in removing stubborn odors caused by smoke and fire damage.
5
. Moisture Meters
Moisture meters are used to measure the moisture content in materials such as walls, floors, and ceilings. This helps in determining the extent of water damage and monitoring the drying process.
6. HEPA Vacuums
HEPA vacuums are used to clean up soot, ash, and other debris left behind by the fire. These vacuums have high-efficiency filters that can capture fine particles, ensuring thorough cleaning.Having a combination of these tools and equipment is essential for a successful fire damage restoration process.
Each tool plays a crucial role in different stages of restoration, from cleaning up debris to eliminating odors and moisture. It is important to use the right equipment for each task to ensure efficient and effective restoration of the property.
Health and Safety Considerations
When it comes to fire damage restoration, ensuring the health and safety of workers and occupants is of utmost importance. The aftermath of a fire can bring about various health hazards that need to be addressed with caution and care.
Potential Health Hazards
- Soot and smoke residue: Inhalation of soot particles and smoke residue can lead to respiratory issues and irritation.
- Chemical exposure: Fire can release harmful chemicals into the air, posing risks to both workers and occupants.
- Mold growth: Moisture from firefighting efforts can create an environment conducive to mold growth, which can cause health problems.
- Structural instability: Fire-damaged structures may have weakened foundations, posing risks of collapse or injury.
Safety Protocols and PPE
- Proper ventilation: Adequate ventilation is crucial to minimize exposure to harmful chemicals and ensure a safe working environment.
- Personal Protective Equipment (PPE): Workers should wear PPE such as gloves, masks, goggles, and protective clothing to protect themselves from hazards.
- Safe handling of materials: Proper handling and disposal of fire-damaged materials are essential to prevent further health risks.
Insurance and Documentation
When it comes to fire damage restoration, insurance plays a crucial role in covering the costs associated with repairing and rebuilding your home. It is important for homeowners to understand how insurance works in these situations and how to properly document the damage for insurance claims.
Role of Insurance in Covering Fire Damage Restoration Costs
Insurance policies typically cover fire damage restoration, but the extent of coverage may vary based on the specific policy. Homeowners should review their insurance policy to understand what is covered and what is not. It is important to contact your insurance provider as soon as possible after a fire to start the claims process.
Process of Documenting Fire Damage for Insurance Claims
Documenting fire damage is essential for insurance claims. Homeowners should take photos and videos of the damage, make a detailed list of items that were affected, and keep all receipts and invoices related to the restoration process. This documentation will help support your insurance claim and ensure that you receive the appropriate coverage.
Tips for Homeowners on Navigating Insurance Claims for Fire Damage Restoration
- Review your insurance policy carefully to understand your coverage.
- Contact your insurance provider immediately after a fire to start the claims process.
- Keep detailed records of all communication with your insurance company.
- Work with reputable fire damage restoration professionals who can provide accurate estimates for the repairs.
- Stay organized and keep all documentation related to the fire damage restoration process in one place.
Final Review
In conclusion, fire damage restoration services play a vital role in bringing properties back to life after a devastating fire. By understanding the process, equipment used, health considerations, and insurance aspects, homeowners can navigate the restoration journey with confidence.
Question Bank
What are the common causes of fire damage that require restoration services?
Common causes include electrical malfunctions, cooking accidents, faulty appliances, and wildfires.
What is the role of insurance in covering fire damage restoration costs?
Insurance can help cover the expenses associated with fire damage restoration, depending on the policy and coverage.
Why is wearing personal protective equipment (PPE) important during restoration work?
PPE is crucial to protect workers from exposure to harmful substances and ensure their safety during restoration tasks.


Driveway Gate Cost Estimator: Factors, Pricing, and Tips

Exploring Energy Efficient Home Exteriors: A Guide to Cutting Costs and Going Green

Fire Damage Restoration Services: Restoring Properties After the Flames

Finding the Best Siding Contractors Near Me: A Comprehensive Guide

Exploring the World of Interiors

Enhancing Your Home: Custom Home Exteriors
-
 General9 months ago
Finding the Best Siding Contractors Near Me: A Comprehensive Guide
-
 General9 months ago
Exploring the World of Interiors
-
 General9 months ago
Enhancing Your Home: Custom Home Exteriors
-
 General9 months ago
Exploring the Roof Replacement Cost Estimate: Factors, Materials, and Labor
-

 General9 months ago
The Ultimate Guide to Licensed Home Improvement Contractors
-

 General9 months ago
Exploring the Beauty of Hardie Cobblestone
-

 Architecture9 months ago
Exploring the World of Interior Architecture
-

 General9 months ago
Exploring the Best Replacement Window Companies for Your Home